


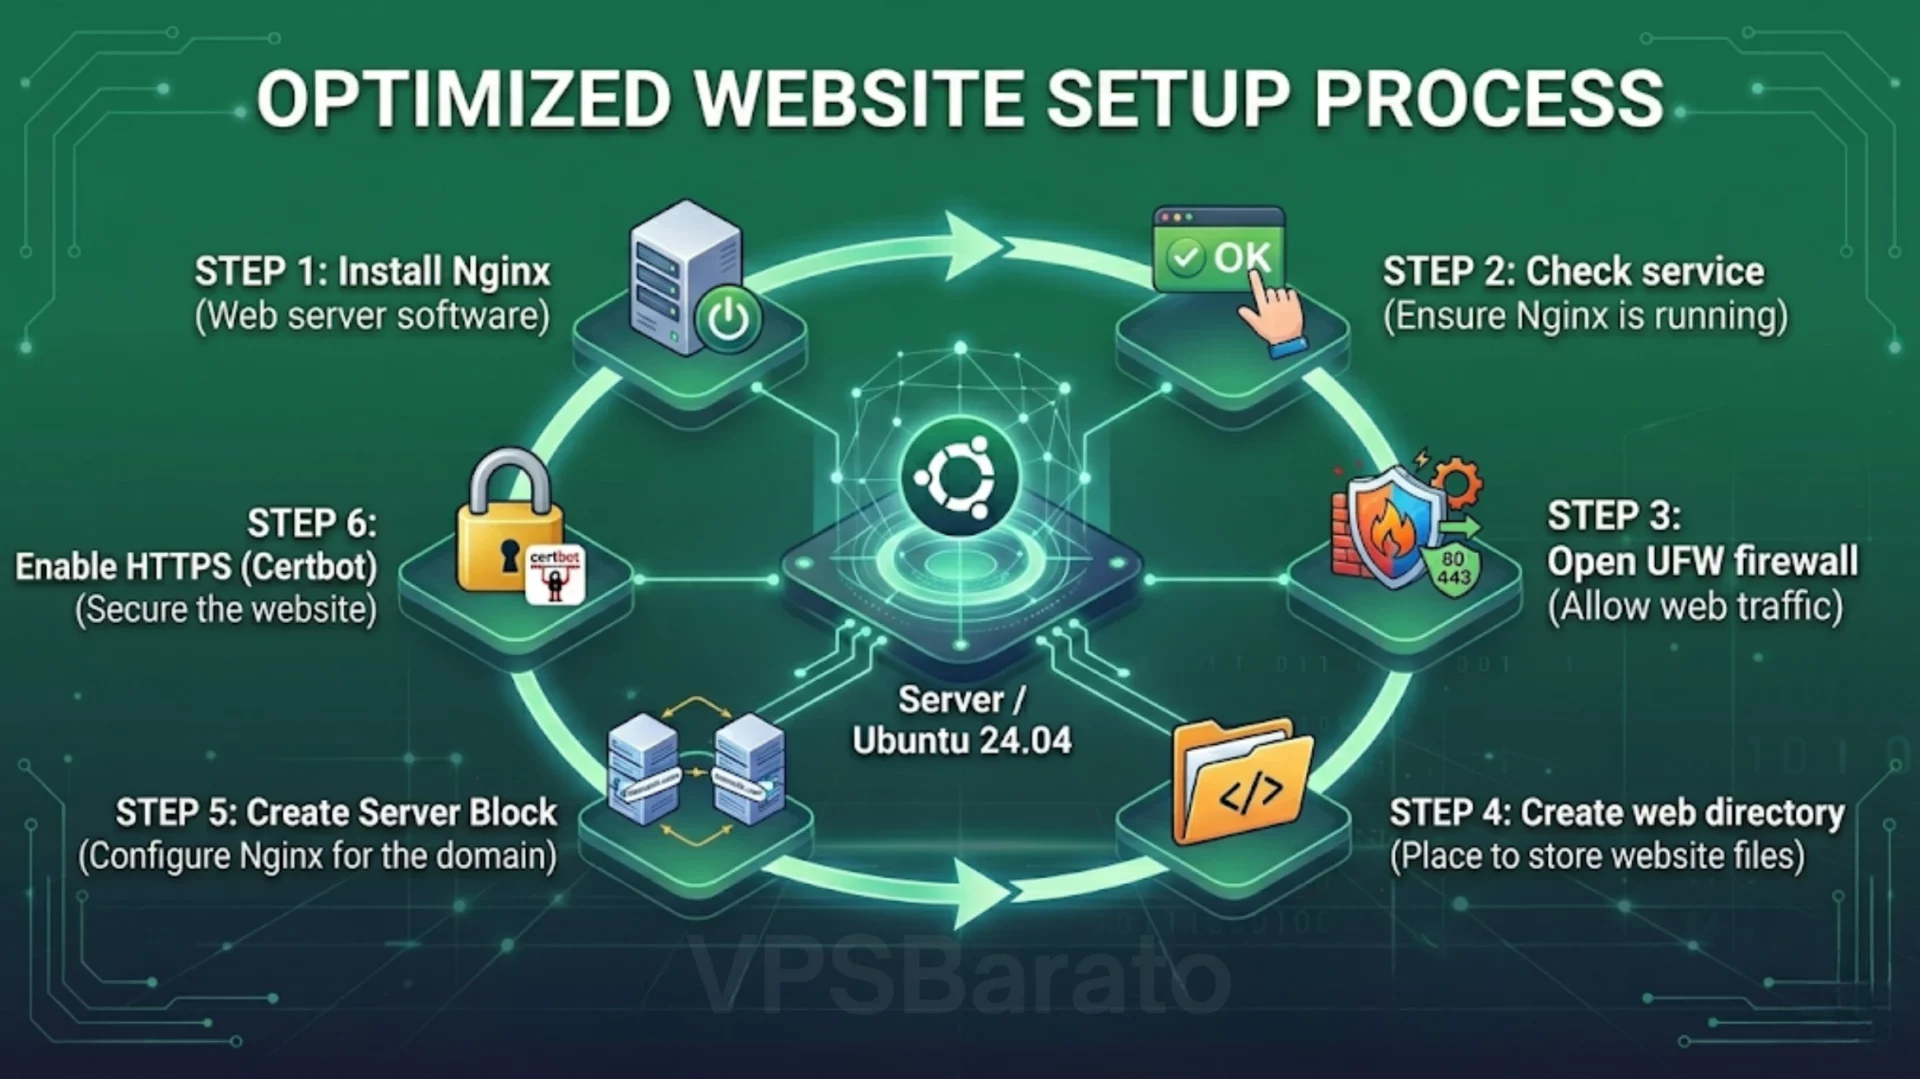
If you’ve just created an Ubuntu 24.04 VPS and want to build a website quickly, Nginx is the easiest option to deploy. The standard process doesn’t just stop at installing the Nginx package – you also need to enable the firewall, create a separate server block for the domain, check the configuration, and enable HTTPS.
This article follows a practical, real-world approach. Simply follow each step to get a basic site up and running smoothly. The commands are concise and the explanations are clear – you can get started right away after reading.
How to install Nginx on Ubuntu 24.04
Before We Begin: What Do We Need to Prepare?
- The Ubuntu 24.04 VPS can now be logged in via SSH.
- Users with sudo privileges can install packages and modify system configurations.
- Your domain is ready to point to your VPS IP address if you plan to set up SSL as described in this article.
- It’s important to maintain a stable SSH connection throughout the configuration process.
Even if you don’t have a domain yet, you can still install and test Nginx first using your server’s IP address.
If you still need a server before starting, you can deploy a US VPS with Ubuntu and begin this Nginx setup right away.
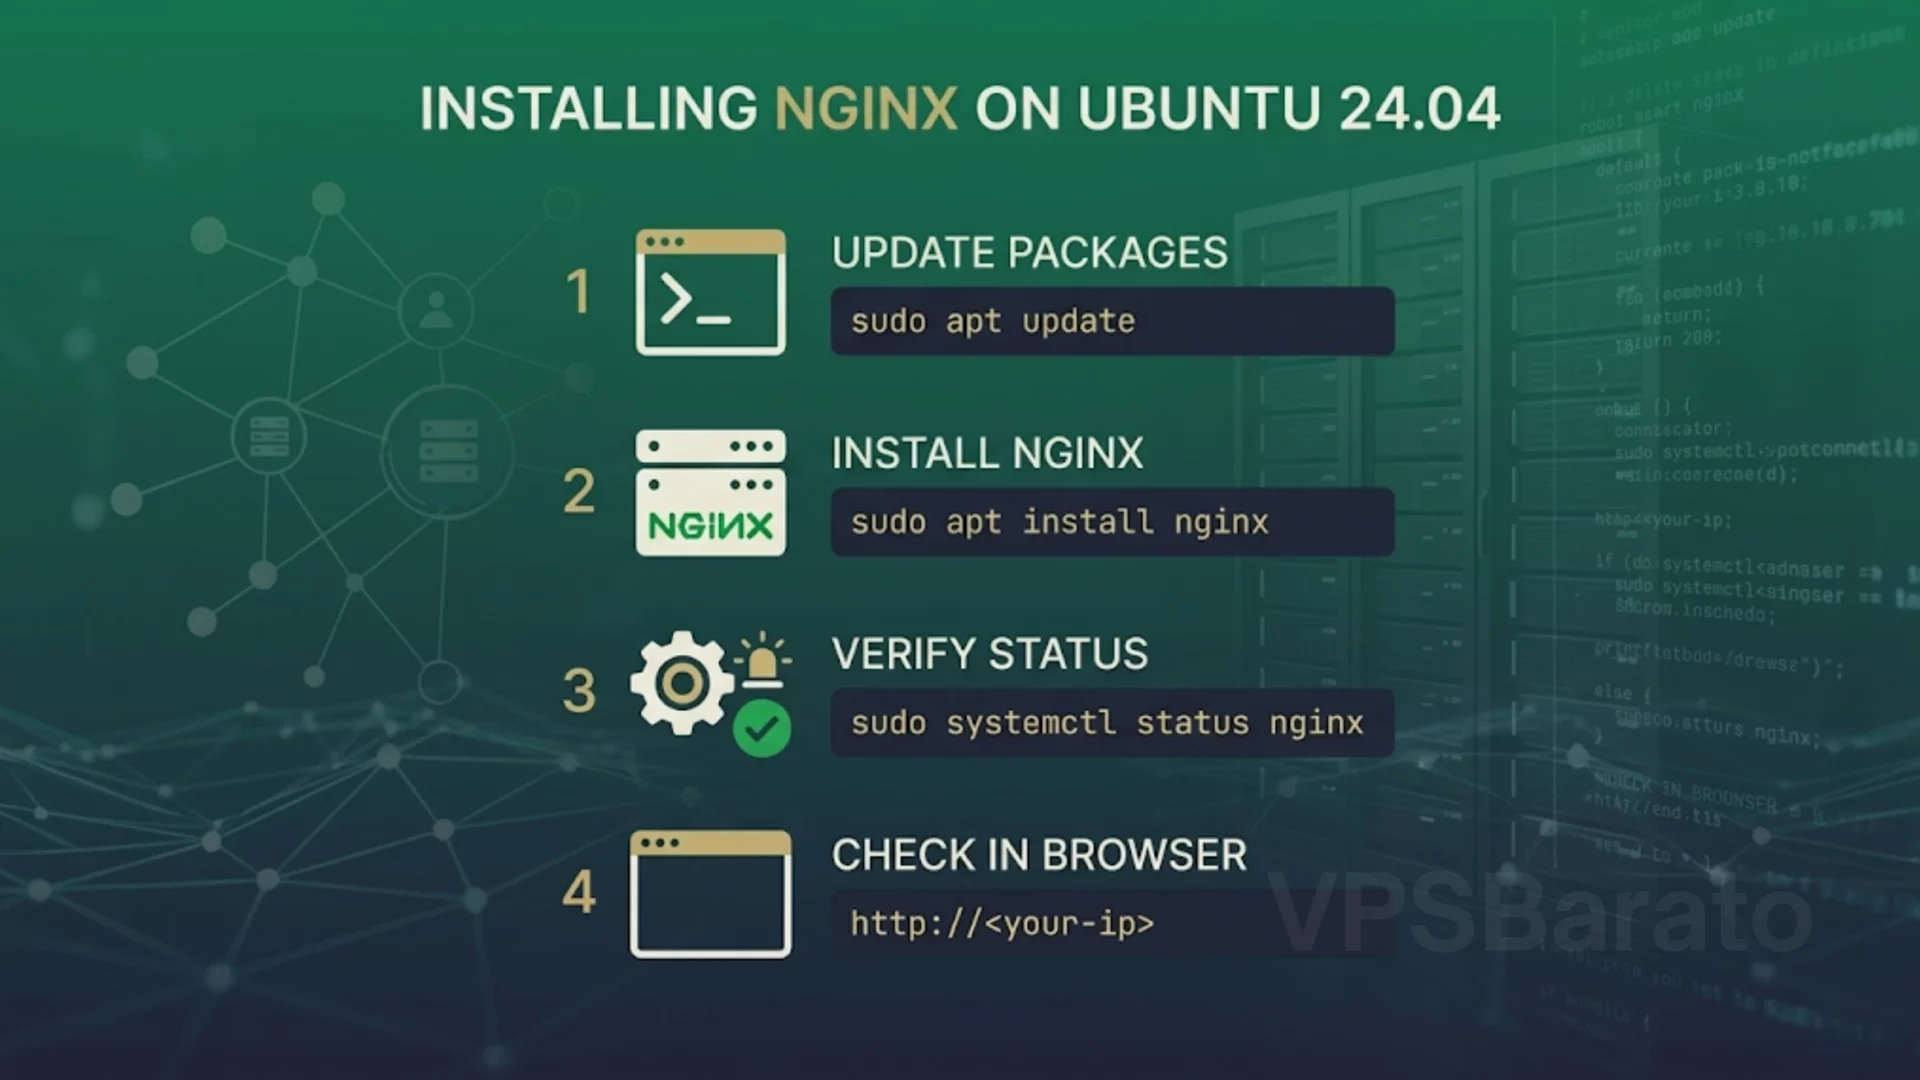
Step 1: Install Nginx on Ubuntu 24.04
On Ubuntu 24.04, the quickest way to install Nginx is using APT. Update the package list and then install Nginx:
sudo apt update
sudo apt install nginx -y
After installation, Nginx will start immediately. Check the service status to ensure the web server is running properly.
sudo systemctl status nginxIf the screen displays active (running)“…”, Nginx is running. Try opening the VPS IP address in your browser – if you see the default Nginx welcome page, the basic setup is complete.
Some Nginx administration commands to remember:
sudo systemctl start nginx     # Start Nginx
sudo systemctl stop nginx      # Stop Nginx
sudo systemctl restart nginx   # Restart Nginx
sudo systemctl reload nginx    # Reload configuration
sudo nginx -t # Test configuration syntaxreloadUsed when you want to reload the configuration without interrupting the service. nginx -tIt’s an important command for catching syntax errors before applying the new configuration.
Step 2: Open the UFW Port so the website can be accessed from outside.
Many people install Nginx but still can’t access the web because they forgot to enable their firewall. On Ubuntu, the default firewall tool is UFW. Check the firewall status first:
sudo ufw statusIf UFW is enabled, allow the Nginx Full profile – this profile opens both HTTP and HTTPS (ports 80 and 443):
sudo ufw app list
sudo ufw allow 'Nginx Full'
sudo ufw status
If the server is newly installed and UFW is still turned off, carefully check the SSH rules before enabling the firewall to avoid automatically blocking remote access.
Step 3: Create a Web Directory and Website Test File
You can place the source code in the .ht folder /var/www/html, but a better way is to create a separate directory for each website – it’s easier to manage when a VPS runs multiple domains.
sudo mkdir -p /var/www/example.com
sudo chown -R $USER:$USER /var/www/example.com
Create a file index.htmlfor quick testing:
nano /var/www/example.com/index.htmlPaste the following content:
<!doctype html>
<html lang="en">
<head>
    <meta charset="utf-8">
    <title>Nginx Ubuntu 24.04</title>
</head>
<body>
    <h1>Hello Nginx</h1>
    <p>Your website is running on Ubuntu 24.04.</p>
</body>
</html>
The purpose of this file is to verify that Nginx is reading the correct web directory before you insert the actual source code.
Step 4: Create a Server Block for the Domain
Server Block is a configuration file used to map a domain to the correct directory for the website or application to run. This is a mandatory step if you don’t want to continue using the default site.
Create a new configuration file in sites-available:
sudo nano /etc/nginx/sites-available/example.comPaste the following basic configuration:
server {
    listen 80;
    listen [::]:80;

    server_name example.com www.example.com;

    root /var/www/example.com;
    index index.html index.htm;

    location / {
        try_files $uri $uri/ =404;
    }
}
Activate the site by linking to sites-enabled:
sudo ln -s /etc/nginx/sites-available/example.com /etc/nginx/sites-enabled/Disable the default file if you don’t want Nginx to continue returning the default page:
sudo rm -f /etc/nginx/sites-enabled/defaultRemember to replace it example.comwith your real domain. If you’re using a .domain www, point both domains wwwto the same server IP address.
Step 5: Check the configuration before reloading Nginx.
Every time you modify Nginx configuration, test it first to avoid syntax errors that could cause your site to crash:
sudo nginx -tIf the screen displays syntax is okand test is successful, reload the configuration:
sudo systemctl reload nginxCommon errors that may occur when nginx -treporting an error:
- There is a missing semicolon at the end of the directive.
- Missing or extra curly braces in the block
serveror parentheseslocation. - Incorrect path
rootor incorrect configuration file name. server_nameThe domain name entered is incorrect compared to the actual domain being used.
Step 6: Point Your Domain to the VPS Before Enabling HTTPS
The domain needs to point correctly to the VPS IP address for Certbot to issue the SSL certificate. Create an A record for the main domain, and add appropriate A or CNAME records wwwif needed.
Quick check using command:
ping example.com
nslookup example.com
Once the domain is correctly pointed, test it http://your-domain.comin your browser. If the site displays content, you can proceed to the step of enabling HTTPS.
Step 7: Enable HTTPS with Certbot
This step should be done after the HTTP site is accessible normally. With Nginx, Certbot can automatically adjust the configuration to enable HTTPS without manual intervention.
Install Certbot using the officially recommended method (using snap):
sudo snap install --classic certbot
sudo ln -s /snap/bin/certbot /usr/local/bin/certbot
Run the certificate issuance command and let Certbot automatically configure Nginx:
sudo certbot --nginx -d example.com -d www.example.comDuring the process, Certbot will ask if you want to redirect all HTTP to HTTPS. For a typical public site, you should choose redirect .
Check for automatic certificate renewal:
sudo certbot renew --dry-runIf the `test renew` command runs correctly, HTTPS is complete. Open https://your-domain.comto check the padlock icon.
Step 8: Review the Website After Completion
After completing the entire process, double-check in the following order to avoid missing any errors:
- Open the VPS IP address to ensure Nginx is still delivering content normally.
- Open the domain using HTTP to check if it automatically switches to HTTPS.
- Open the domain using HTTPS to check if the certificate is valid.
- Run again
sudo nginx -tif you have just modified the configuration file. - Run this
sudo ufw statusto confirm the firewall rules are still correct.
Common Errors When Installing Nginx on Ubuntu 24.04
Installation is complete, but I can’t access the IP address.
Check the service using ` sudo systemctl status nginx. If it’s not running, restart it. If the error persists, check the logs using `.` journalctlor check if port 80 is occupied by another service.
I can access it using IP address but not via domain.
This is usually because the DNS is not pointing correctly or server_namethe configuration file doesn’t match the actual domain. Check the A record and the server block file.
nginx -t results in a syntax error.
The most common errors are missing semicolons, incorrect parentheses, or extra characters in a copied configuration file. Do not reload before nginx -tit reports success.
Certbot failed to issue SSL.
This is usually due to the domain not pointing correctly to the server, port 80 being blocked, or the HTTP site not being online. Address these three issues and then run Certbot again.
UFW is open but the website is still timeing out.
Check the VPS provider’s firewall or the cloud-based security group’s firewall. In many cases, the UFW is correct, but the external firewall is still blocking the port.
When Should You Use a Reverse Proxy?
If you’re only running static web applications or basic PHP, the current configuration is sufficient. However, if the server is running Node.js, a Docker app, or a backend on a dedicated port, Nginx is often used as a reverse proxy. In that case, the server block file will change in the `<div>` locationand `<div>` sections proxy_pass.
Recommendation: Complete the static site setup first. Once the site is stable with your domain and HTTPS, then moving on to configuring a reverse proxy will make debugging much easier.
Frequently Asked Questions
Can Nginx be installed using APT on Ubuntu 24.04?
Yes. APT is the quickest and easiest way to install Nginx on Ubuntu 24.04.
Is it mandatory to open UFW?
If UFW is enabled, then yes. You must allow HTTP or HTTPS to pass through, otherwise the website will not be accessible from outside.
Is it necessary to create a Server Block if there is only one website?
It’s a good idea. Using a separate configuration file makes it easier to manage, enables SSL easily, and simplifies the process of adding other websites later.
Should I use Certbot to enable HTTPS?
Yes. With Nginx, Certbot is the fastest way to obtain Let’s Encrypt certificates and automatically configure HTTPS without manual adjustments.
Official References
If you want to review the official documentation used for this setup, check these resources:
Conclude
The optimal process for building a website on Ubuntu 24.04 is: install Nginx → check services → open UFW → create the web directory → create a server block → test the configuration → enable HTTPS using Certbot. Following this order will help you avoid most basic errors and get your site up and running smoothly from the start.
Nginx setup process on Ubuntu 24.04 with UFW, Server Block, and HTTPS
What is VPSBarato?
VPSBarato is a global provider of high-performance Cloud VPS, Proxy, and server infrastructure solutions. We offer a wide range of services including VPS, Cloud VPS, Residential Proxy, Datacenter Proxy, GPU Servers, and Dedicated Servers with both Windows and Linux operating systems.
🌐 Website: https://vpsbarato.com/
📺 YouTube: @vpsbarato 💬 Telegram: @vpsbarato
📘 Facebook: https://www.facebook.com/vpsbarato/